
centos下如何使用fdisk扩展分区容量大小
番茄系统家园 · 2022-09-27 05:56:19
扩展磁盘空间
硬盘空间为20G,使用vSphere Client增加磁盘大小,需要再增加10G空间;
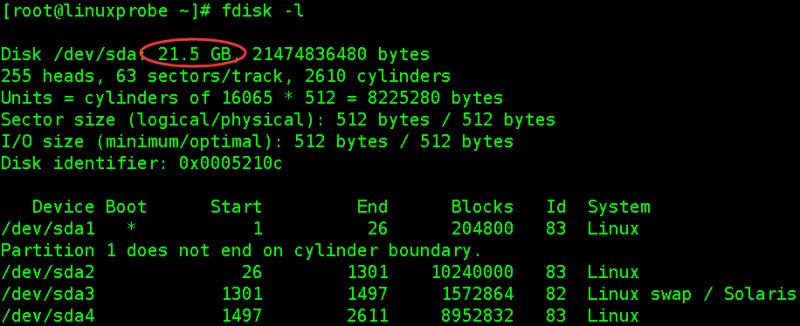
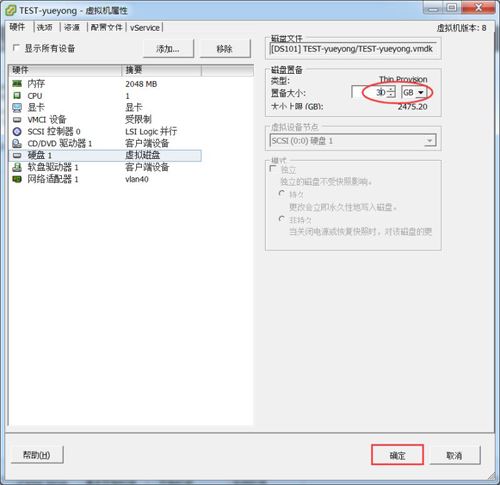
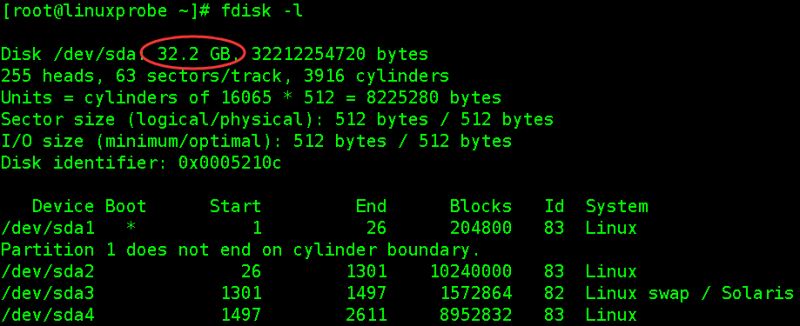
扩展完后,重启系统,再次使用fdisk -l查看,会发现硬盘空间变大了;
[root@linuxprobe ~]# fdisk -l Disk /dev/sda: 32.2 GB, 32212254720 bytes 255 heads, 63 sectors/track, 3916 cylinders Units = cylinders of 16065 * 512 = 8225280 bytes Sector size (logical/physical): 512 bytes / 512 bytes I/O size (minimum/optimal): 512 bytes / 512 bytes Disk identifier: 0x0005210c Device BootStart EndBlocks IdSystem /dev/sda1 * 126204800 83Linux Partition 1 does not end on cylinder boundary. /dev/sda226130110240000 83Linux /dev/sda313011497 1572864 82Linux swap / Solaris /dev/sda414972611 8952832 83Linux [root@linuxprobe ~]# df -hT Filesystem Type SizeUsed Avail Use% Mounted on /dev/sda2ext4 9.7G1.5G7.7G16% / tmpfstmpfs939M 0939M 0% /dev/shm /dev/sda1ext4 194M 34M151M19% /boot /dev/sda4ext4 8.5G148M7.9G 2% /data免责声明: 凡标注转载/编译字样内容并非本站原创,转载目的在于传递更多信息,并不代表本网赞同其观点和对其真实性负责。如果你觉得本文好,欢迎推荐给朋友阅读;本文链接: https://m.nndssk.com/xtwt/2054631qE1Ps.html。
重新创建分区,调整分区信息
本次实验主要对/dev/sda4这个分区扩展,如果是生产环境,请提前做好备份保存到其他分区,虽然扩展分区大小不会导致数据丢失,安全起见,请提前做好备份;
首先模拟出一些数据:
[root@linuxprobe data]# mkdir test [root@linuxprobe data]# echo "we are Linuxer" > linuxprobe [root@linuxprobe data]# ll total 24 -rw-r--r--. 1 root root15 May 23 21:59 linuxprobe drwx------. 2 root root 16384 May 23 15:07 lost+found drwxr-xr-x. 2 root root4096 May 23 21:51 test [root@linuxprobe ~]# umount /dev/sda4#卸载磁盘分区若提示磁盘忙,使用fuser找出将正在使用磁盘的程序并结束掉;
fuser -m -v /data fuser -m -v -i -k /data使用fdisk工具先删除/dev/sda4分区,然后创建新分区,注意开始的磁柱号要和原来的一致(是保证数据不丢失的关键步骤),结束的磁柱号默认回车使用全部磁盘。
[root@linuxprobe ~]# fdisk /dev/sda WARNING: DOS-compatible mode is deprecated. It's strongly recommended to switch off the mode (command 'c') and change display units to sectors (command 'u'). Command (m for help): p#查看分区表信息Disk /dev/sda: 32.2 GB, 32212254720 bytes 255 heads, 63 sectors/track, 3916 cylinders Units = cylinders of 16065 * 512 = 8225280 bytes Sector size (logical/physical): 512 bytes / 512 bytes I/O size (minimum/optimal): 512 bytes / 512 bytes Disk identifier: 0x0005210c Device BootStart EndBlocks IdSystem /dev/sda1 * 126204800 83Linux Partition 1 does not end on cylinder boundary. /dev/sda226130110240000 83Linux /dev/sda313011497 1572864 82Linux swap / Solaris /dev/sda414972611 8952832 83Linux Command (m for help): d #删除分区Partition number (1-4): 4 #删除第四个Command (m for help): p #再次查看分区信息,/dev/sda4已被删除Disk /dev/sda: 32.2 GB, 32212254720 bytes 255 heads, 63 sectors/track, 3916 cylinders Units = cylinders of 16065 * 512 = 8225280 bytes Sector size (logical/physical): 512 bytes / 512 bytes I/O size (minimum/optimal): 512 bytes / 512 bytes Disk identifier: 0x0005210c Device BootStart EndBlocks IdSystem /dev/sda1 * 126204800 83Linux Partition 1 does not end on cylinder boundary. /dev/sda226130110240000 83Linux /dev/sda313011497 1572864 82Linux swap / Solaris Command (m for help): n#创建新的分区Command action e extended p primary partition (1-4) p #创建为主分区 Selected partition 4 First cylinder (1497-3916, default 1497):#经对比,正好和上一个磁盘柱一致,默认即可Using default value 1497 Last cylinder, +cylinders or +size{K,M,G} (1497-3916, default 3916): Using default value 3916#直接默认就可以Command (m for help): p #查看分区表信息Disk /dev/sda: 32.2 GB, 32212254720 bytes 255 heads, 63 sectors/track, 3916 cylinders Units = cylinders of 16065 * 512 = 8225280 bytes Sector size (logical/physical): 512 bytes / 512 bytes I/O size (minimum/optimal): 512 bytes / 512 bytes Disk identifier: 0x0005210c Device BootStart EndBlocks IdSystem /dev/sda1 * 126204800 83Linux Partition 1 does not end on cylinder boundary. /dev/sda226130110240000 83Linux /dev/sda313011497 1572864 82Linux swap / Solaris /dev/sda41497391619436582 83Linux Command (m for help): wp #保存并退出,如果创建有误,直接退出不要保存即可The partition table has been altered! Calling ioctl() to re-read partition table. WARNING: Re-reading the partition table failed with error 16: Device or resource busy. The kernel still uses the old table. The new table will be used at the next reboot or after you run partprobe(8) or kpartx(8) Syncing disks.
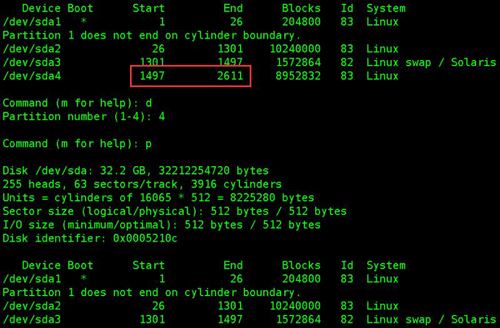
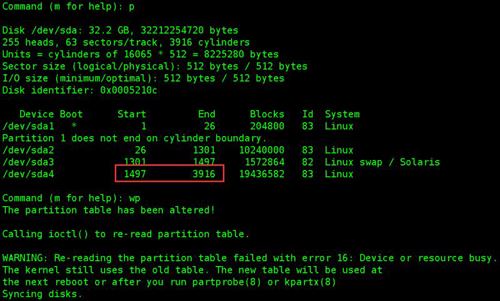
重新创建分区后,需要重启一下;
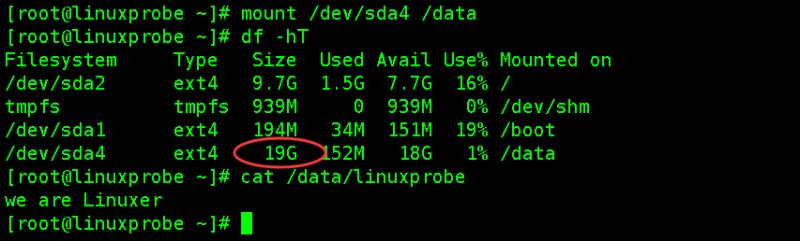
[root@linuxprobe ~]# init 6 [root@linuxprobe ~]# e2fsck -f /dev/sda4#检查分区信息[root@linuxprobe ~]# resize2fs -p /dev/sda4 #调整分区大小重新挂载、查看分区大小、数据
[root@linuxprobe ~]# mount /dev/sda4 /data [root@linuxprobe ~]# df -hT [root@linuxprobe ~]# cat /data/linuxprobe we areLinuxer
猜你喜欢
最新应用







热门应用